HOW TO CREATE A CHANNEL IN MEDIASPACE
Use a Channel to access and share your videos with your class or all of Bucknell, you can also a channel as a way to allow students to submit their own videos to a course, project or assignment.
1
|
Go to mediaspace.bucknell.edu and login.
Select My Channels from the menu in the upper right corner.
|

|
2
|
Find the “+ Create Channel” button on the right side of the screen, and click.
|

|
3
|
Fill in the fields on the Create a New Channel page. You will be able to edit the text at a later time. When you are finished, select the Save at the bottom of the screen, when you are finished.

Privacy Options:
-
Open - All logged in users can view and contribute content (contribution is not allowed for viewer-role users).
-
Restricted - All logged in users can view content and only channel members can contribute content.
-
Private - Only channel members can view and contribute content.
-
Shared Repository - Only channel members can view and contribute content; Content may be published to other channels, according to publishing entitlements.
-
Public, Restricted - Anyone can view content (including anonymous not logged-in users). Only channel members can contribute content according to their publishing entitlements.
|
4
|
A Users tab will also become available.
|

|
1
|
From the Users tab, you will be able to add Members, Contributors, Moderators and Managers to your Channel.
|

|
2
|
An Add Members option will become available. From this tab, you will be able to add Members, Contributors, Moderators and Managers to your Channel.
|

|
| |
Members - can see the channel and play the videos.
Contributors - can add videos to the channel.
Moderator - can release videos to the channel if you are moderating the content.
Manager - has almost full control of the channel.
|
3
|
Use the search box to add the user’s name or bucknell username. If they are in the user database, their username will pop up. If they are not in the database, they will need to login into Mediaspace to be added to the database. Make sure to assign the proper role when you add a person.
Then Click Add.
|
4
|
Click Back to Channel in the lower corner of the screen to Add Media.
|
1
|
On your Channel Page, click the light-blue button which reads, Add to Channel
|

|
2
|
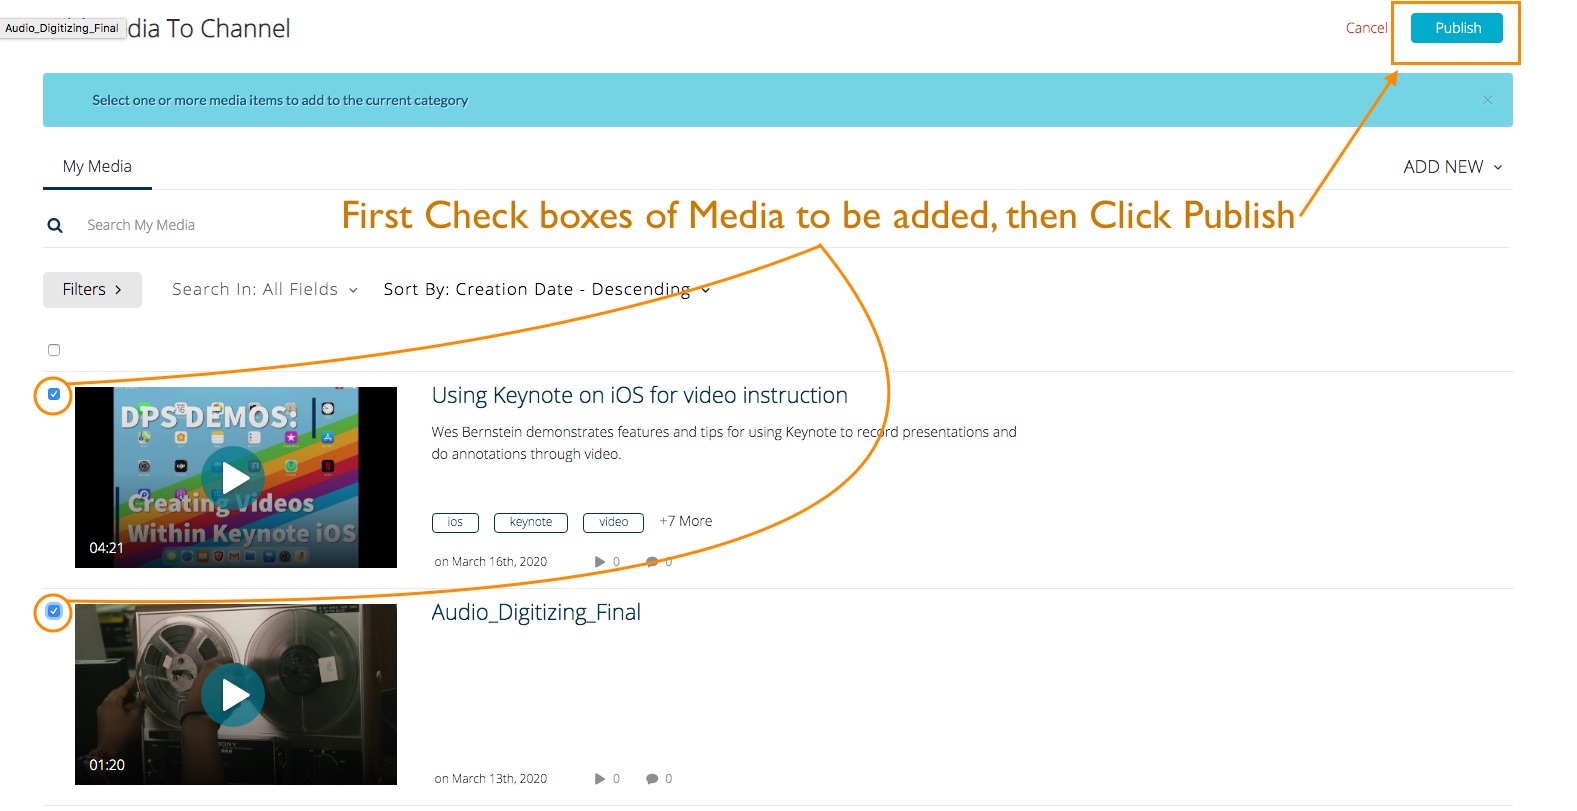
This will bring up a screen to select media. If you have already uploaded and created your video, click the small checkbox(s) to the left of the media thumbnail, and then click Publish in the upper right corner of the window.
|

|
3
|
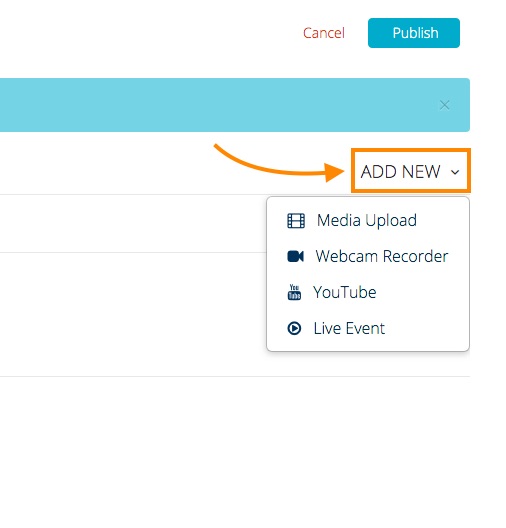
If you want to upload directly to the channel, without uploading to My Media first, click the + Add New button underneath the Publish button. And you see the same options you have for My Media in the top menu of Mediaspace.
|

|
4
|
When you have finished publishing or uploading new media, your screen will revert back to the channel page, and you should see a green bar that indicates your media was published successfully.

|
1
|
Select My Channels from your user name menu, then find the channel you want to edit, and select the small pencil icon in the lower right corner of the channel thumbnail.
|

|
2
|
In the Channel edit menu, select the Playlists option near the top
|

|
3
|
Find the "+ Create Channel Playlist" on the right side of the window.
|

|
4
|
Name the playlist (and add a description), You must include a minimum of 3 tags (keywords) to help your users find the content. Then click on the Add button to save your changes.
|
 |
5
|
To add videos to the playlist, click on the "Add to playlist" button. |
 |
6
|
Now click on the "+" icon next to each video that you want to add to the playlist. |
 |
7
|
Make sure you click the "Done" button when you have finished selecting your videos, and then hit the "Save" button near the top, to finish saving the Playlist. |
 |
8
|
Playlists will then appear within your channel, and you can choose the order, or make edits to the content within and share playlists indepently. |
If you have questions about using Mediaspace, please contact dps@bucknell.edu.
Updated 3/26/20.