Inactivity Timeout - Azure Remote Lab will log you out automatically after 60 minutes of inactivity. You will NOT be prompted to save your work.
Saving Work - While your profile is persistent and you can save files, we still recommend that you save your files in Google Drive. You can sign in to Google Drive from the Start Menu shortcut, this will mount it as a G:\ drive in File Explorer
Video Streaming - Due to performance limitations, do not stream video (YouTube, Netflix etc.) within your Virtual desktop. Video quality will be much better by accessing these sites directly from your device.
User Access - All faculty and students have been granted access to the system. Staff are generally not, due to software licensing restrictions. If you would like to request an exception, please submit a Tech Ticket.
What is a Virtual Desktop?
Bucknell University’s Azure Remote Lab program provides students with access to a virtual Windows computer which is the technological equivalent to our Windows computers in labs around campus. This Windows Desktop can be accessed from any location.
There are commonly used software applications available on each remote lab - see below.
Available Software:
- JMP Pro
- Kaleidagraph
- Mathcad Prime
- MATLAB
- Microsoft Office
- Microsoft Visio
- Microsoft Project
- Minitab
- R
- RStudio
- SAS
- SPSS
- Stata
- Aspen HYSYS
- Biowin
- NVIVO
- Gurobi
- SMath Solver
College of Management Available Software:
- Excel (with PowerQuery and Data Analysis Toolpak add-ins)
- Analytic Solver for Excel
- Anaconda - Jupyter Lab
- Simio
- Gurobi
- R Studio
- Tableau
- Tableau Prep
- Microsoft Office
- Microsoft Project
- Microsoft Visio
- DBeaver
- MySQL
- Notepad ++
To request a software application be added to the system, click here to submit a ticket.
Access Azure Remote Lab from your laptop
Windows:
- Download and install the remote desktop application from https://go.microsoft.com/fwlink/?linkid=2139369
- Launch Remote Desktop

- Click on Subscribe with URL button

- Enter the following into the Workspace URL box: https://rdweb.wvd.microsoft.com in the box, then click Next

- On the Microsoft sign-in screen, enter your Bucknell email address

- Select Work/School Account

- Enter your Bucknell account password
-
If multi-factor authentication is set up, select your phone number to send a pin, enter your code, and select verify. Otherwise skip down to step one below this image.

Setup Multi-factor authentication (MFA) via text message
- To Setup Multi-Factor Authentication (MFA) via text message. First select I want to set up a different method.

- Select Phone

- Enter your phone number, select Receive a code, and select next

- Click Next

- select your phone number to send a pin, enter your code, and select verify.

- Once Remote Desktop has been configured, double click the Bucknell Remote Lab icon and enter your password to enter the Virtual Desktop

- To open and application, click on the Start Button and start typing name in Search box, or click on All Apps and scroll through the list to select it
- Black/White and Color print queues are installed to allow users to print from Virtual Desktop. Once print is sent, you can release it from any Follow-Me printer across campus.
- To end your Virtual Desktop session, right click on Start button, select Shut Down/Sign Out, then click on Sign Out.
Mac
- Download the Windows App application from the App Store or self service on a Bucknell-owned device

- Launch the Windows App.
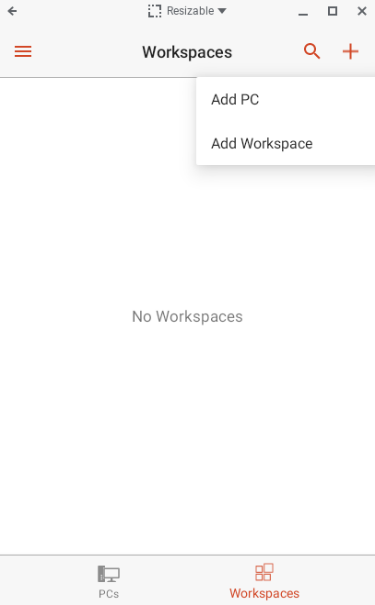
- Windows App opens on the Devices tab. Select the plus (+) icon, then select Add Workspace, then expand the next sentence.

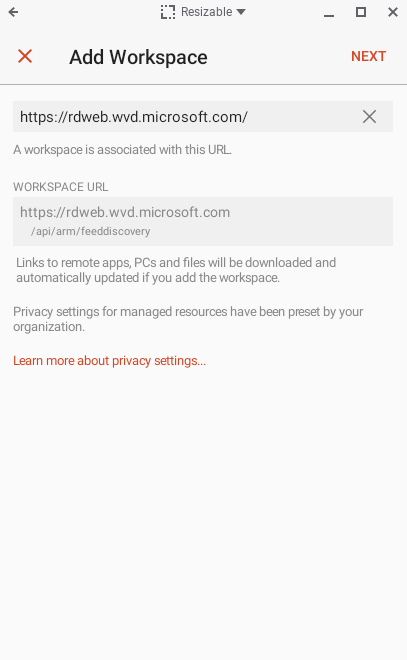
- Enter the following URL into the Add Workspace box: https://rdweb.wvd.microsoft.com then click Add

- On the Microsoft sign-in screen, enter your Bucknell email address

- Select Work/School Account
- Enter your Bucknell account password
-
If multi-factor authentication is set up, select your phone number to send a pin, enter your code, and select verify. Otherwise skip down to step one below this image.
Setup Multi-factor authentication (MFA) via text message
- To Setup Multi-Factor Authentication (MFA) via text message. First select I want to set up a different method.
- Select Phone
- Enter your phone number, select Receive a code, and select next
- Click Next
- select your phone number to send a pin, enter your code, and select verify.
- Once Remote Desktop has been configured, double click the Bucknell Remote Lab icon and enter your password to enter the Virtual Desktop

- To open an application, click on Start Button and start typing name in search box, or click on All Apps and scroll through the list to select it
- Black/White and Color print queues are installed to allow users to print from Virtual Desktop. Once print is sent, you can release it from any Follow-Me printer across campus
- To end your Remote Lab session, right click on Start Button, select Shut Down/Sign Out, then click on Sign Out
Linux
Login to Azure Remote Lab
- On the Microsoft sign-in screen, enter your Bucknell email address and select Next
- Then enter your Bucknell password and select Sign in
- Select Work/School Account
- If multi-factor authentication (MFA) is set up, select your phone number to send a pin, enter your code, and select verify. Then skip to the section labeled Using Remote Desktop. If MFA hasn't been set up, go down to step one below in the section titled Setup Multi-factor Authentication (MFA) via text message.
Setup Multi-factor authentication (MFA) via text message
- To Setup Multi-Factor Authentication (MFA) via text message. First select I want to set up a different method.
- Select Phone
- Enter your phone number, select Receive a code, and select next
- Click Next
- select your phone number to send a pin, enter your code, and select verify.
Using Remote Desktop
- Once Remote Desktop has been configured, double click the Bucknell Remote Lab icon and enter your password to enter the Virtual Desktop
- To open and application, click on the Start Button and start typing name in Search box, or click on All Apps and scroll through the list to select it
- Black/White and Color print queues are installed to allow users to print from Virtual Desktop. Once print is sent, you can release it from any Follow-Me printer across campus.
- To end your Virtual Desktop session, right click on Start button, select Shut Down/Sign Out, then click on Sign Out.
Chromebooks:
- Open the remote Desktop application
-
After you accept License Terms, click on Workspaces on bottom bar, click the + symbol (top right), then select Add Workspace
-
Enter https://rdweb.wvd.microsoft.com in the box, then
click Next
-
On the Microsoft sign-in screen, enter your Bucknell email address
-
Select Work/School account
-
Enter your Bucknell account password
-
If multi-factor authentication is set up, select your phone number to send a pin, enter your code, and select verify. Otherwise skip down to step one below this image.
Setup Multi-factor authentication (MFA) via text message
- To Setup Multi-Factor Authentication (MFA) via text message. First select I want to set up a different method.
- Select Phone
- Enter your phone number, select Receive a code, and select next
- Click Next
- select your phone number to send a pin, enter your code, and select verify.
-
Once Remote Desktop has been configured, double click the Session Desktop icon and enter your password to enter the Remote Lab
-
To open an application, click on Start Button and start typing name in Search box, or click on All Apps and scroll through the list to select it.
-
Black/White and Color print queues are installed to allow users to print from Virtual Desktop. Once print is sent, you can release it from any Follow-Me printer across campus.
-
To end your Virtual Desktop session, right click on Start button, select Shut Down/Sign Out, then click on Sign Out